Installing TailwindCSS on a BigCommerce Stencil theme modernizes front-end design with fast, responsive utility classes. When configured through PostCSS and purge rules, Tailwind delivers lightweight styles and streamlined development without hurting performance.
Search is changing—and fast.
What once felt like a predictable playbook of keywords, rankings, and blog posts is now a dynamic, AI-fueled ecosystem that’s rewriting the rules of visibility and engagement. For e-commerce brands, especially those who rely on organic search to capture and convert high-intent buyers, these changes are both a challenge and a massive opportunity.
Let’s explore how organic search is evolving in 2025—and what smart brands are doing to stay not just visible, but valuable.
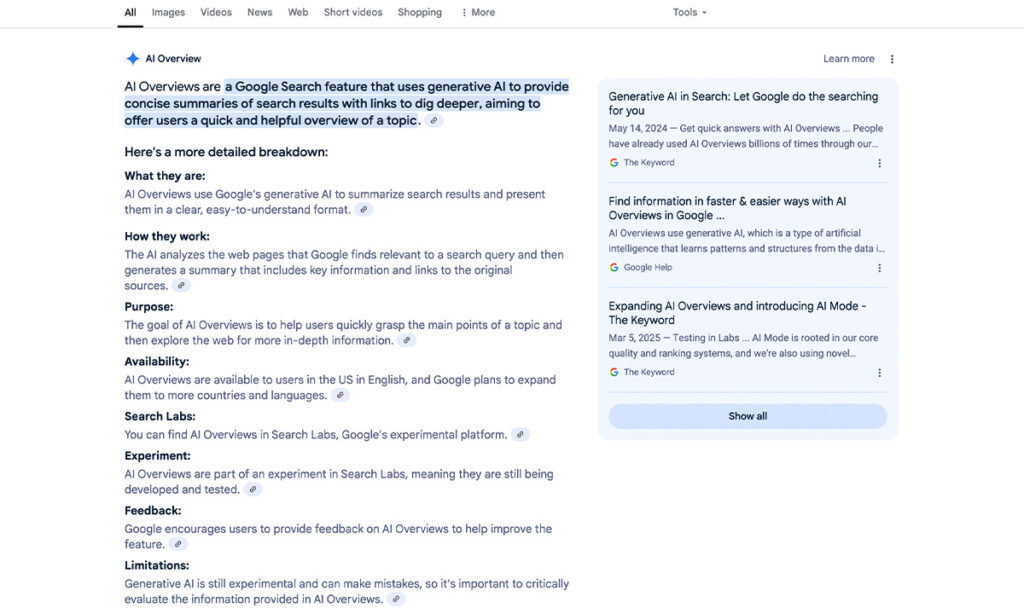
AI Overviews Are Reshaping the SERP
The most noticeable shift? AI Overviews (AIOs) are taking over informational search results.
These Google-generated summaries give users instant answers without needing to click through to a site. Helpful for searchers, yes—but brutal for brands who rely on that organic click-through.
Even well-optimized pages are being pushed down the page in favor of Reddit threads and AI-generated blurbs. And while AIOs haven’t fully taken over transactional queries yet, they’re on the way.
That means brands must rethink what it means to “rank”—because being visible in 2025 isn’t just about being on Page 1. It’s about being referenced, cited, structured, and meaningful in entirely new ways.
Transactional Search: Structured Data is Your Superpower
While informational search is getting devoured by AI, transactional search—the kind where users are ready to buy—is still wide open. But it’s getting more competitive.
Here’s what matters now:
- Product schema and structured data are no longer optional. They’re essential for appearing in product panels, shopping carousels, and rich results.
- Review content, FAQs, and pricing info all need to be marked up clearly and consistently.
- AI testing in transactional search is underway. We expect AIOs to begin influencing buying queries soon. Brands that prepare structured, intent-matched content now will have a head start.
Intent Modeling: The New Keyword Research
Traditional keyword research is out. Intent modeling is in.
This strategy goes deeper than volume and competition—it’s about mapping real customer questions, motivations, and journeys to content that actually meets them where they are.
Because the truth is: people lie to peers and focus groups, but they don’t lie to Google—or to AI-powered behavioral insights that help optimize their experience in real time.
When we analyze what people actually search for, we uncover authentic insights that fuel not just SEO, but messaging, UX, product strategy, and more.
Funnel Gap Analysis: Meeting Intent at Every Stage
Most SEO content focuses on top-of-funnel queries. But what happens when someone is ready to buy—and your site doesn’t answer their next question?
They bounce. Or worse, they buy from someone else.
That’s why funnel gap analysis is crucial. It ensures your content ecosystem aligns with every stage of the buyer journey—from awareness to consideration to decision and support.
It’s not about churning out more content—it’s about creating the right content, purpose-built for intent.
“He has been absolutely incredible to work with – coming from everyone on the MAKE team that has engaged with him. Since we were down a couple key players on the project, Caleb had to, and on more than one occasion, insert himself into the conversation to help guide and ultimately develop the solution in real-time with the client. This is all the while getting acquainted and familiarizing himself with the system at-large, a task too daunting for most devs on such a short-timeline.”
— Evan Kirsch, CEO – Make Digital
AIO Optimization: Don’t Just Compete—Contribute
AIOs might feel like black boxes, but they can be decoded.
By analyzing which questions trigger AI summaries, how Google structures those answers, and what sources it prefers, brands can reverse-engineer content that’s more likely to be cited. This isn’t just SEO—it’s AI SEO.
Our approach includes:
- Scraping AI Overviews and extracting key points
- Mapping them to user personas and funnel stages
- Creating content that directly answers the questions fueling AIOs
When you speak Google’s AI language, you don’t just rank—you get referenced.
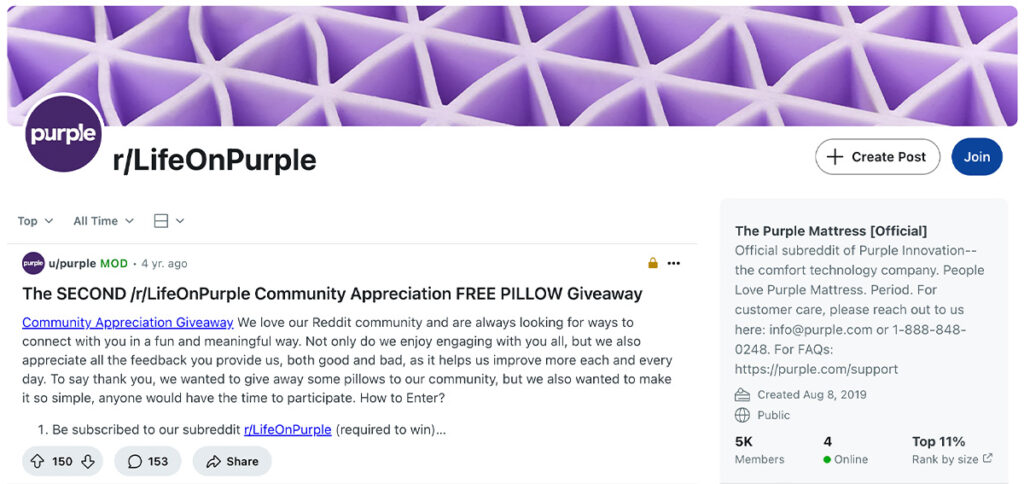
Reddit is the New Forum for Trust
If you’ve noticed Reddit threads outranking brand blogs, we see it too. Everywhere.
Google now prioritizes authentic, community-driven answers to real questions—especially when trust matters. That makes Reddit both a risk and an opportunity for brands.
Many brands are:
- Participating authentically in relevant subreddits
- Answering questions without pitching
- Using Reddit feedback to inform SEO strategy and content development
Search success now includes social listening. Your next best keyword? It might come from a comment thread.
So, What Can You Do?
Search in 2025 is less about rankings and more about relevance. Here’s what to prioritize:
- Use structured data to unlock rich, visual results for transactional queries
- Model real consumer intent instead of just keywords
- Fill content gaps across your funnel
- Optimize for AI Overviews through strategic formatting and Q&A-style content
- Engage in community spaces like Reddit to build trust and uncover insights
Final Thoughts: Organic Search Isn’t Dead—It’s Just Evolving with Technology
What we’re witnessing isn’t the end of organic search. It’s a transformation. AI is making search more intelligent—and more demanding. To thrive, brands must become more intentional, more human, and more data-savvy.
This moment calls for bold strategies grounded in real understanding.
If you’re ready to make your organic presence as dynamic and future-ready as your brand deserves, we’d love to help. At LimeLight, we fuse creativity, data, and intent to make every digital experience meaningful.
Let’s make your search strategy smarter—and a lot more human.
If you’d like to talk to an expert about your strategy, contact us to schedule a call.