Google & Yahoo Sender Requirements - What You Should Know as an Ecommerce Email Marketer


As we entered Q4 of 2023, both Google and Yahoo announced a new set of requirements for those who send 5,000+ emails per day. These will be enforced starting 1 February 2024 with the goal of decreasing spam, blocking harmful messages, and decluttering users’ inboxes.
Widespread industry changes like these can be a huge source of stress for ecommerce email marketers, as they could mean total upheaval for how you conduct business. But don’t worry. These changes are actually quite easy to implement once you know what you need to do – and chances are you’re already doing most of them!
So take a deep breath and read on for our no-nonsense guide to the latest changes in ecommerce email marketing practices.
What are Google and Yahoo’s new sending requirements?
While both companies call these “new” requirements, this is actually a bit misleading.
For the most part, several steps that have been considered industry best practices for years are becoming enforceable rather than recommended. That means if you’ve been keeping up with best practices, you probably meet most of the new sender requirements already.
You also don’t need to worry about meeting two different sets of requirements. That’s because Google’s demands are much stricter. So if you meet those, you’ll also meet Yahoo’s by default.
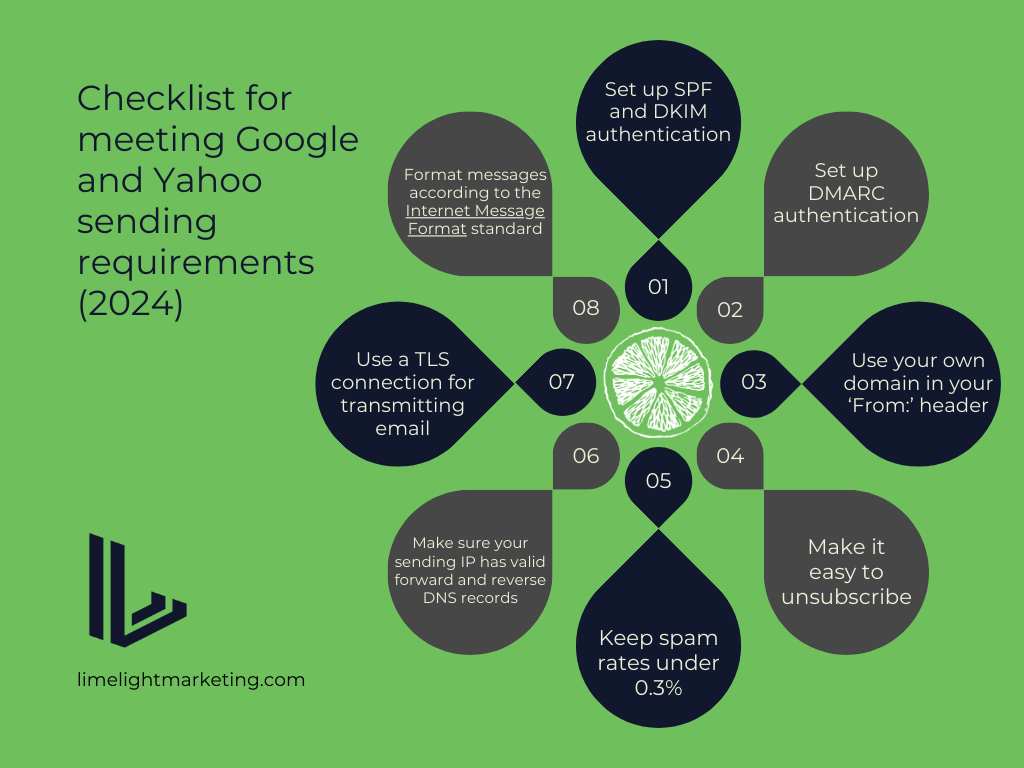
To keep things simple, here’s a straightforward checklist of what you need to do:
- Set up SPF and DKIM authentication
- Set up DMARC authentication
- Use your own domain in your ‘From:’ header
- Make it easy to unsubscribe
- Keep spam rates under 0.3%
- Make sure your sending IP has valid forward and reverse DNS records
- Use a TLS connection for transmitting email
- Format messages according to the Internet Message Format standard (RFC 5322)
Of these 8 steps, your email service provider will ensure you’re using a TLS connection and that your messages follow RFC 5322. That leaves just 6 steps for you. We cover how to satisfy these in a later section.
What do these changes mean for ecommerce email marketers?
When an ecommerce marketing email hits the spam folder, it can be annoying for both the recipient and the sender. But these new changes help solve both problems at the same time.
First, these mass email sender requirements ensure your emails are properly authenticated. This helps email platforms distinguish between spam emails and value-adding emails like yours. That means your emails are more likely to reach your prospect’s inbox to be opened, read, and acted upon.
Second, by making it super easy to unsubscribe, it’s much less likely that a recipient will get frustrated and mark your emails as spam. As a result, Google and Yahoo are more likely to see your communications as trustworthy and relevant, improving your deliverability score and customer engagements.
Updating your email records and adjusting your content can feel like a nuisance. But by enforcing these small steps, the new requirements actually help you deliver a better user experience and improve the success of your email marketing campaigns.
How should an ecommerce marketer prepare for this update?
1) Set up SPF, DKIM, and DMARC
Sender Policy Framework (SPF) and DomainKeys Identified Mail (DKIM) protect your domain against spoofing. This is a type of email attack that impersonates your ‘From:’ address to send spam and phishing messages.
Both SPF and DKIM are set up when you first go through domain authentication for your sending domain. Each email service provider has slightly different instructions for this process. So you’ll need to check the Help section of your provider’s website for more details.
You’ll need to configure SPF and DKIM at least 48 hours before you turn on Domain-based Authentication, Reporting & Conformance (DMARC) – another anti-spoofing protocol.
You can set up DMARC authentication for your Domain Name System (DNS) yourself. Google recommends setting your DMARC policy to ‘none’ and gradually changing it as necessary during your DMARC rollout.
To set up DMARC:
- Go to your DNS hosting provider and create a record
- Choose ‘TXT’ DNS record type
- Add the host value ‘_DMARC’. If your DNS provider doesn’t automatically add your domain name, change the host value to ‘_dmarc.yourdomain.com’
- Create your DMARC record and add it to the DNS TXT value. This should look like: ‘v=DMARC1; p=none; rua=mailto:dmarc@yourdomain.com’
For more information on how to set up SPF, DKIM, and DMARC, see Google’s instructions to help prevent spoofing, phishing, and spam.
2) Match your ‘From:’ header with your domain name
Currently, bulk senders can use a shared domain to send emails. But once Google and Yahoo implement their new requirements, you’ll need your own bulk sending domain.
In other words, the domain in your ‘From:’ header must be the same as your sending domain. This is true for both marketing and transactional emails.
Unless you’re just getting started, you almost certainly have your own domain. In that case, you already meet these requirements. But if you use a gmail.com or yahoomail.com email address, you need to invest in your own domain to avoid landing in the spam folder.
Note that while you won’t be able to use a shared domain, you can still use a shared IP address. There’s no need to set up a dedicated IP just for your emails.
3) Make it easy to unsubscribe
Your marketing and other subscribed emails must enable one-click unsubscribe and feature a clearly visible unsubscribe link in the message body. To set up one-click unsubscribe, add the following headers to your outgoing messages:
- List-Unsubscribe-Post: List-Unsubscribe=One-Click
- List-Unsubscribe: <https://yourdomain.com/unsubscribe/example>
It’s also recommended that you:
- Give recipients the option to review the individual mailing lists they’re subscribed to and let them unsubscribe from lists individually or all at once
- Automatically unsubscribe recipients with multiple bounced messages
4) Check your forward and reverse DNS records
Use an online tool such as MxToolbox Reverse IP Lookup or DNS Checker to confirm that your sending IP address has valid forward and reverse DNS records (called PTR records). If yours are missing, contact your web hosting or email service provider to create one for you.
You typically can’t create PTR records yourself, as most companies don’t have control over the reverse DNS zone for their website’s domain. But if you do, check your service’s guide for how to create a PTR record.
5) Limit your spam emails
This should always be a priority for any ecommerce email marketer. But now you need to stay under the spam rate hard cap of 0.3%. Use Google’s PostMaster Tools to track your spam complaint rates and make sure you only send relevant and valuable emails.
Prepare now to limit negative impacts on your email marketing
By following these simple steps, you’ll ensure your email program isn’t flagged by email service providers and continues to have the best opportunity to reach your target audience. If you’re concerned about meeting sending requirements, let’s chat. We’re happy to take a look at your setup and discuss options.