In my recent blog post From Zero to Vue with ASP.NET Core Razor Pages in 10 Minutes, I showed how to quickly add Vue to a standalone razor page for a more dynamic/interactive experience. While this is great for either testing Vue out, or very simple/limited scenarios, what if you want to add more Vue capabilities to an existing web application that isn’t an SPA? You can use great features like single file components with just a few simple steps.
A few quick disclaimers before we get started:
- This isn’t really a from scratch Vue tutorial – there are lots and lots of resources out there on how to use Vue and the Vue CLI. This is focused on integrating Vue into an existing web app that’s already using an older front-end framework like jQuery.
- While the examples throughout this tutorial are specific to ASP.Net web apps, the principles apply to many other frameworks. Also, I chose to use ASP.Net rather than ASP.Net Core for this example just to demonstrate that this can be done with an older/legacy app. You could certainly translate these steps to ASP.Net Core, or even a PHP, Java, or Node.js web app.
- This tutorial assumes you don’t want to work with a SPA (Single Page Application), but rather that you want to incorporate some reactive/Vue functionality into an existing traditional app.
- I’m using Visual Studio 2019 on Windows for the examples in the tutorial, you could use other IDEs as well (e.g. VS Code). If you use Visual Studio, I highly recommend the Vue.Js Pack extension.
Why add Vue to an Existing Web App?
There are lots of applications floating out there that still have the correct business logic and a backend that serves the purpose well, but perhaps the UI is aging or in need of a refresh. This is a perfect situation to bring Vue in!
Let’s take a look at a sample existing scenario. The following is a page built with Razor templating/jQuery in a legacy ASP.Net Framework app that loads data to a grid in a page. It uses an ajax call to hit a fake api endpoint populate an html table of user data:
![]()
The result looks something like this:

It works fine, but it could use a visual refresh. I’m also not a big fan of mixing html markup up/appending it to the page with javascript code. The separation of concerns isn’t great, and it’s easy to make a mistake.
First, I’ll go over how we can add Vue using the Vue CLI, and re-create exactly what we had in jQuery with Vue. Then, we’ll take it to the next level by setting up some nice looking Vue Components.
Bringing Vue Into the Project
So the first thing we want to do is bring the full capabilities of Vue into this project so we can start making components, with minimal disruption to the existing items. Perhaps the plan is to leave most of the jQuery pages intact, and slowly start to migrate things to Vue in time as needed.
To start with, the first thing we need to do is ensure we have npm installed. The easiest way to get npm in Windows is to just install Node.js, – npm will come with it.
Once npm is installed, we need to install the Vue CLI. Open your favorite terminal (e.g. CMD, PowerShell, or my personal favorite Hyper), and type the following:
npm install -g @vue/cliOnce that completes, you’ll have the tools in place you need to add Vue to your existing project or spin up brand new Vue projects. From the terminal, navigate into the same folder that your ASP.Net web application’s solution is in. Note that you want to be at this level, not inside the next folder down. Here’s where you want to be:

Once you are here, type
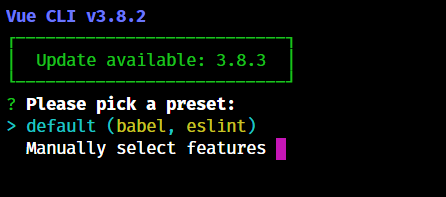
vue create [foldername]Where folder name is the name of the folder that matches your solution name. In my case it would be “dotnetframeworkvuecli” (note it has to be all lowercase, even if the folder isn’t, or the Vue CLI will complain about it). You will be prompted with the option to merge or overwrite – be sure to select merge – this will add the Vue files to your existing folder. Next you will be asked what presets you want to use for compilation – you can select default(babel, eslint) here and press enter:
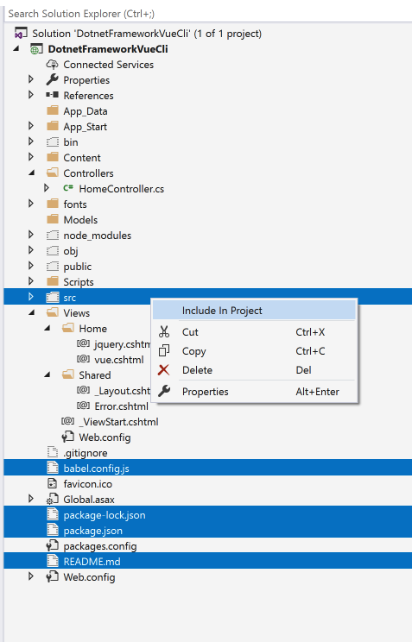
This process will take several minutes. Once it’s done, if you go inside of the project folder for your solution, you’ll notice several new files and folders added by the Vue CLI:
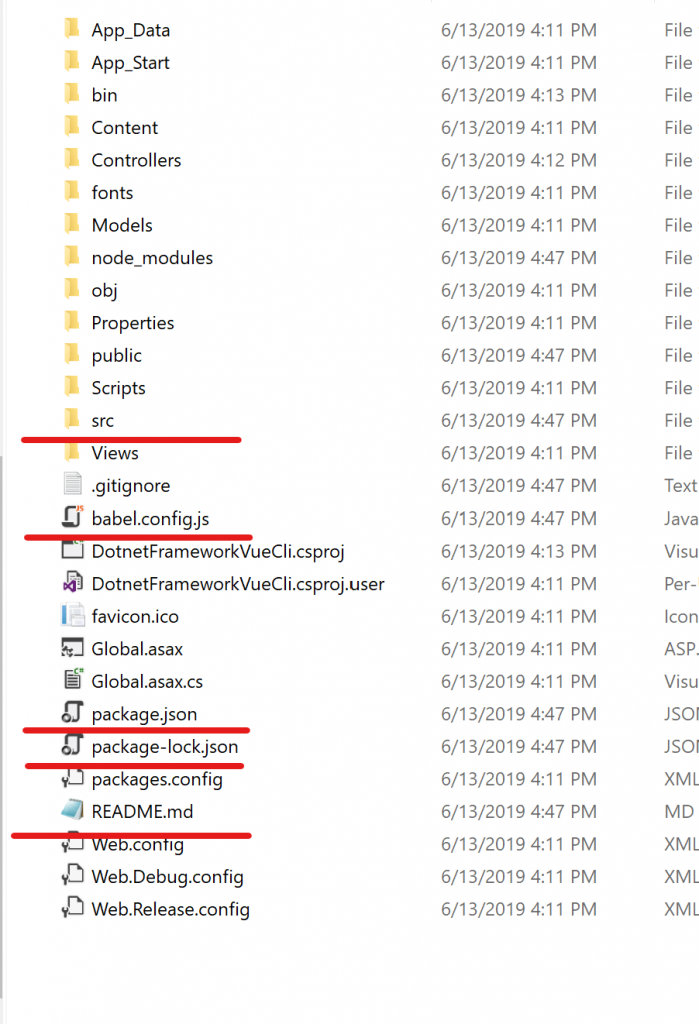
We want to make sure these are included in our ASP.Net project, so next we’ll open the project up in Visual Studio, show hidden files, and include them all in the project:
We’ll work within the project in Visual Studio from this point forward. The next thing we need to do is add a “vue.config.js” file to the root of the project. This file dictates how Vue handles compiling the Vue components in the project down to plain javascript. The contents of the file should look something like this:
module.exports = {
  outputDir: './wwwroot/dist',
  lintOnSave: false,
  productionSourceMap: false,
  filenameHashing: false,
  css: {
    extract: {
      filename: '[name].css'
    }
  },
  configureWebpack: {
    optimization: {
      splitChunks: false
    },
    output: {
      filename: '[name].js'
    },
    resolve: {
      alias: {
        'vue$': 'vue/dist/vue.esm.js'
      }
    }
  },
}
A couple things to note here:
- The output dir is where our compiled javascript will go. I like to put it in “wwroot/dist”.
- The filename hashing option specifies whether or not to include a unique id at the end of the generated javascript. For simplicity I’m leaving this off, but If you need to ensure cache busting you might use this option. You could also use options within the ASP.Net app to handle cache busting.
- The configure webpack section overrides some default webpack settings that the Vue CLI has set up for us. I have optimization: splitChunks set to false so we just have one compiled js file. It’s also important to resolve the path to Vue after that (the resolve/alias section), to make it easy to reference throughout or application.
Next, we need to update the “main.js” file in the “src” folder that was generated by the Vue CLI to tell it how we want Vue to be set up in our project. I have it set up like this:
    import Vue from 'vue'
    Vue.config.productionTip = false

    window.Vue = Vue;
By setting window.Vue equal to the Vue reference that is imported, we ensure that it will be globally accessible throughout the application.
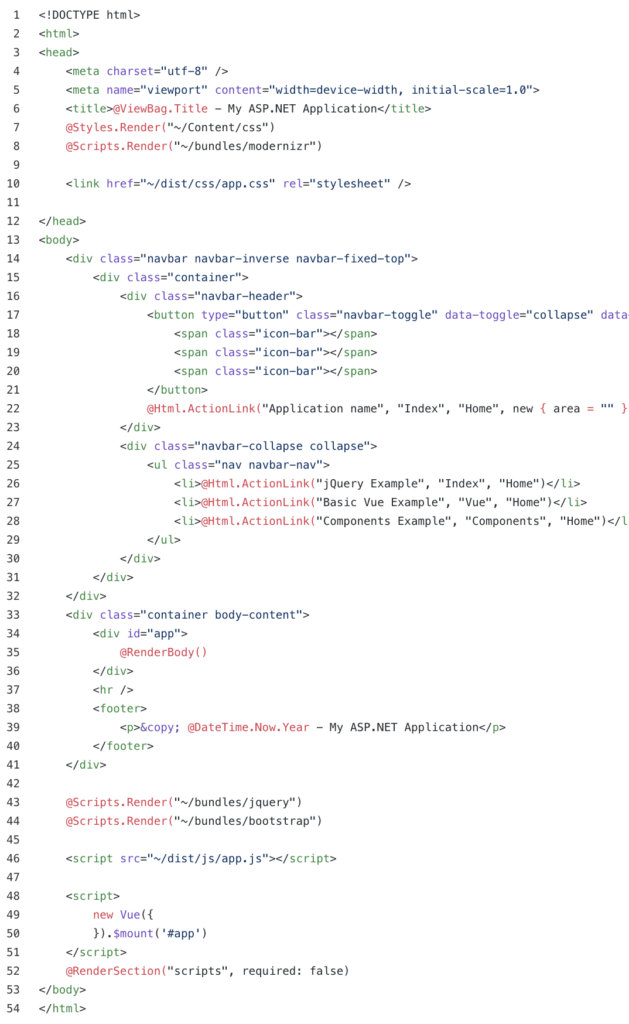
Next, we need to set up a default div for Vue to mount onto to be able to render the components we are going to make. In an ASP.Net application, the best place to do this is in the global layout/skin file, usually named _layout.cshtml. In this file, I wrap the call to @RenderBody() in a div with id = “app”, like so:
    <div id="app">
        @RenderBody()
    </div>
If you’re worried the id “app” might conflict with something else in your project, choose a more specific name. Then after any script tags but before any render sections, add the following:
    <script>
         new Vue({
         }).$mount('#app')
    </script>
This mounts Vue on our app div, allowing us to use any components we create within the body of the web app layout.
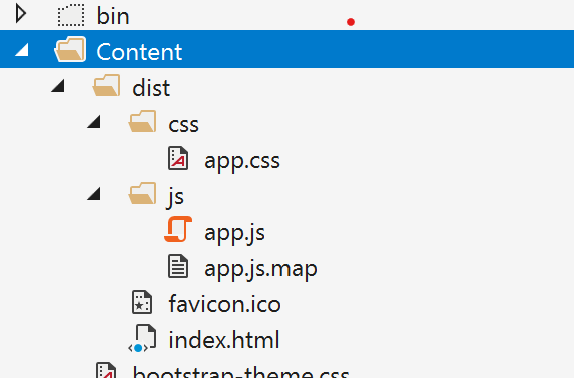
After doing this, we can run “npm run build” from the project directory (same directory the package.json file is in) to compile our Vue to javascript.
This will cause an “app.js” file to be generated inside a js folder in the path we specified earlier (/dist in my case). An “app.css” file is also generated, where any styling from our components will be stored (IF you have <style> tags in any of your components, otherwise no app.css file is generated). Note that the first time you run these, you’ll want to be sure and include the /dist folder in the project if it isn’t already:
The last thing we need to do to get Vue fully set up references this app.js/app.css in our layout file. If no app.css file is generated, you can just leave it out. Here’s a snippet of that along with the other changes we had made to the layout:
Note that this component uses the axios library rather than ajax, so you’ll need to add axios to your package.json and run “npm install”. The thing I like about doing this in Vue vs jQuery, is the nice separation of templating markup vs script logic to fetch data. There’s no appending of html to the page, or any DOM traversal to select elements either.
With that component created, we have to register it so that it can be used in our app. This is done in the src/main.js file, like so:
import Vue from 'vue'
Vue.config.productionTip = false
Vue.component('users-grid', require('./components/UsersGrid.vue').default);
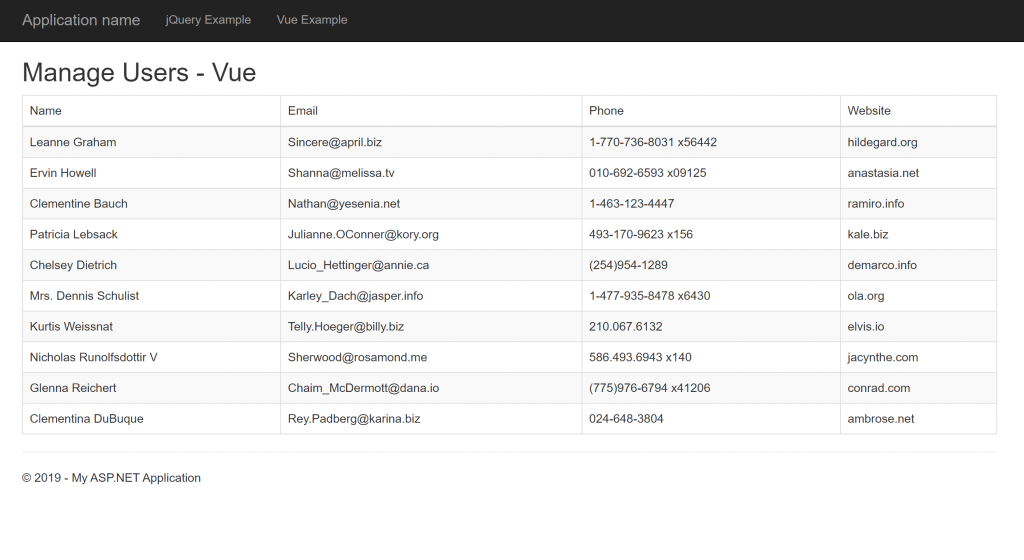
window.Vue = Vue;This tells the Vue instance that is exposed to the window to include the UsersGrid vue component, aliased to “users-grid. Now, after re-building the js (run npm run build in the terminal), we can add this Vue component to a Razor page, like so:
    @{
        ViewData["Title"] = "Manage Users";
    }

    <h2>Manage Users - Vue</h2>

    <users-grid/>
And when we run it – we have essentially the exact same grid as before:
That’s all well and good – we now have a re-usable user grid component we could use throughout our app. However, one of the reasons we are using Vue now though is to make things look and feel more modern, without the pain of doing it in jQuery.
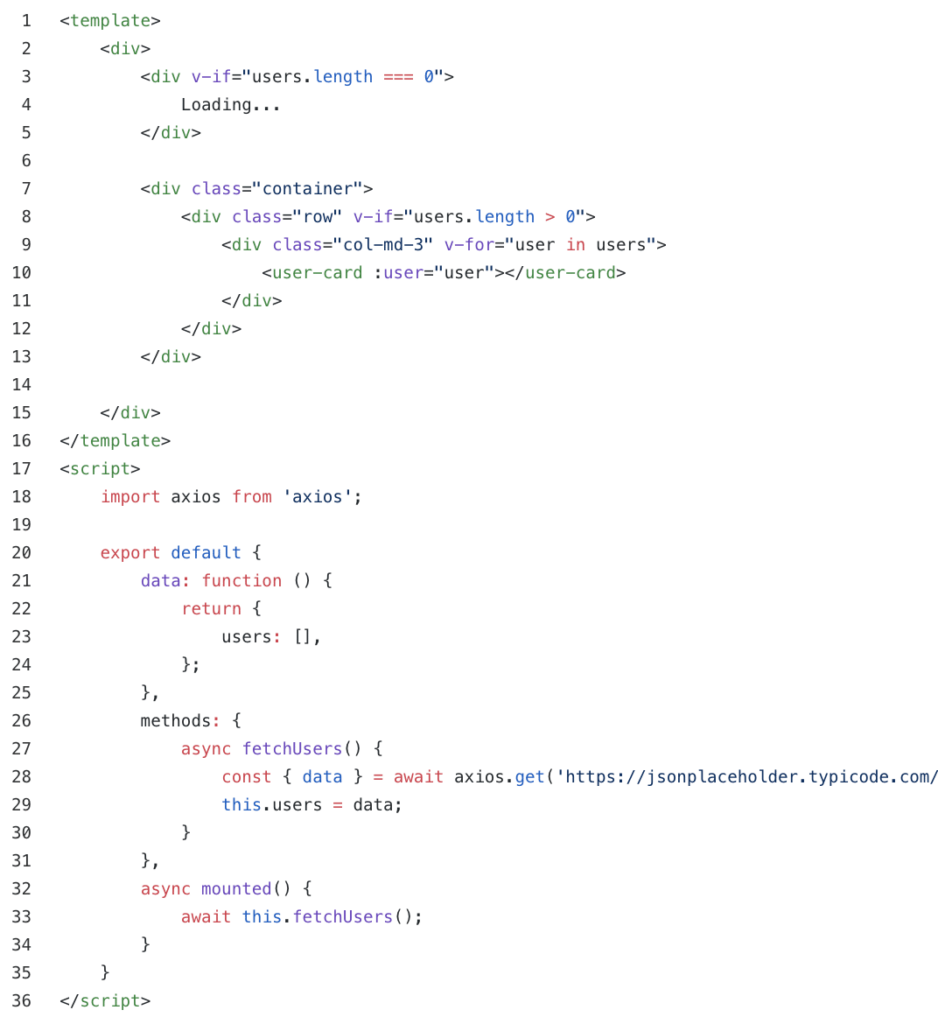
In the spirit of this, let’s say that we want to refresh the look of the grid and use a card type layout, rather than the table rows. I’m going to make a user card component and a user card grid component so we can see how this would look. Both components will be stored in the src/components folder of the project, like the users grid was.
First, the user card component. It looks like this:
![]()
This will show the info about a user in a nice, card format.
The user card grid component looks very similar to the users grid component, just implementing the users card:
We’ll need to register these two components in main.js:
    import Vue from 'vue'
    Vue.config.productionTip = false

    Vue.component('users-grid', require('./components/UsersGrid.vue').default);
    Vue.component('user-card', require('./components/UserCard.vue').default);
    Vue.component('users-card-grid', require('./components/UserCardGrid.vue').default);

    window.Vue = Vue;
And then finally, we can use the users-card-grid component on a page:
    @{
        ViewBag.Title = "Vue Components";
    }

    <h2>Manage Users - Vue Components</h2>

    <users-card-grid/>
The result looks quite nice!

The great thing about this is we have a re-usable user card grid, or just the card if needed wherever we’d like in the future.
Conclusion
That’s a lot to chew on. I’ve got the completed ASP.Net web app with examples of jQuery side by side with these Vue components here. I hope you find these examples helpful if you’d like to start to integrate Vue into your existing web apps!